Isolate the correct breaker by switching the light on and turning off the breakers, then lock it off and verify it is dead with an approved voltage tester (tested on a known live source first). Identify the switch type: 1-way uses COM and L1, 2-way uses COM, L1 and L2, and 2-gang has two separate sets. Connect permanent live to COM, switched live to L1, and earth to the terminal/back box; keep neutrals joined in a connector. Further steps explain 2-way and fault checks for How to Wire a Light Switch UK.
Key Takeaways
- Isolate the correct circuit at the consumer unit, lock it off, and verify it is dead with a voltage tester before touching any wires.
- Confirm your switch type (1-way, 2-way, or 2-gang) by checking terminals: COM/L1 for 1-way; COM/L1/L2 for 2-way.
- Identify conductors: permanent live (brown/red), switched live to the lamp, and earth (green/yellow); keep neutrals (blue/black) in a connector.
- Wire a 1-gang 1-way switch by connecting the permanent live to COM and the switched live to L1, then connect earth to the earth terminal/back box.
- Label wires before disconnecting, use correct tools and sleeving, and neatly dress conductors so the faceplate fits without trapping or stressing cables.
Table of Contents
Make It Safe: Isolate Power and Prove Dead
Before any conductors are touched, the circuit must be made safe by isolating the correct breaker or fuse, then confirming that the switch box is de-energised with an approved voltage tester.
The correct protective device should be identified by switching the light on, isolating one breaker at a time, and confirming the light goes out; then the breaker should be left off or the fuse removed. A lock-off device and warning label should be fitted so nobody can re-energise the circuit without consent.
At the switch position, the faceplate should be loosened carefully, keeping cables undisturbed, and the voltage tester should be used on all terminals, including any permanent live, switched live, and neutrals present in the back box. The tester should be proven on a known live source before and after testing. Only when every check reads dead may work proceed. Freedom starts with control of power.

Gather Tools and Parts to Wire a UK Light Switch
A small set of correct tools and matching parts makes wiring a UK light switch quicker and reduces the chance of damaged terminals or loose connections.
A typical kit includes insulated screwdrivers (flat and Pozi), wire strippers, side cutters, long-nose pliers, and a voltage indicator for final checks. A torch and a small container for screws help keep the workspace controlled and hands free. Parts should match the existing setup and box depth: a quality switch, the correct faceplate and fixing screws, and an appropriate back box if the old one is cracked or shallow.
Keep spare 1.0–1.5 mm² insulated copper conductors only if extensions are unavoidable, and add heat-resistant sleeving to any exposed earth. Use maintenance-free connectors or a Wago-type junction only when needed; never twist and tape. Cable identification sleeves and a marker support clear, reversible work.
Identify Your UK Light Switch Wiring Type (1-Way, 2-Way, 2-Gang)
With the tools and matching parts ready, the next step is to verify what type of UK light switch wiring is present, since the terminals and conductor layout differ between 1-way, 2-way, and 2-gang switches. This quick check helps avoid guesswork, keeps options open, and guarantees the correct replacement switch is chosen.
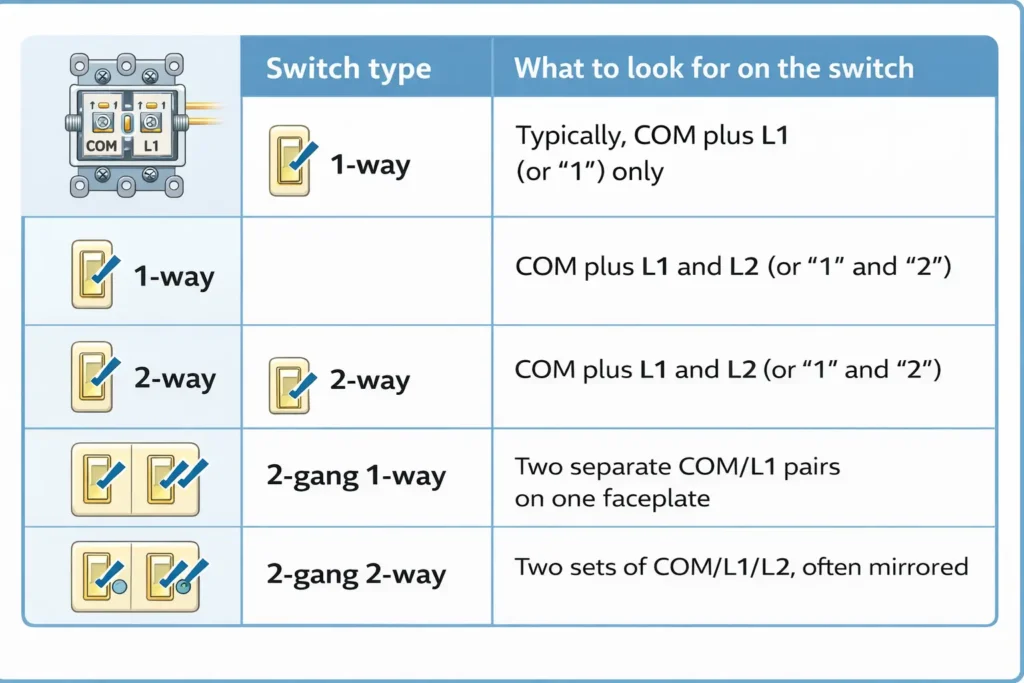
A faceplate with one rocker is usually single-gang; two rockers indicate 2-gang. If the switch controls one light from two locations (e.g., hall and landing), it is typically 2-way. Matching the terminal labels to the existing pattern protects freedom to upgrade, swap styles, or add smart modules later for How to Wire a Light Switch UK.
Identify Switch Conductors: Permanent Live, Switched Live, Earth
Colour, position, and terminal markings form the key to identifying the three conductors at a UK light switch: permanent live (feed in/out), switched live (to the lamp), and earth (CPC). Permanent live is the always-energised feed and any loop onward; in modern twin-and-earth it is brown, though older wiring may use red. It is often grouped with other lives, and may be sleeved brown/red when repurposed.
Switched live only becomes live when the switch is on; it runs to the light fitting. It is commonly a brown core in a separate cable, or a blue core sleeved brown in “switch drop” arrangements never assume blue means neutral at the switch. Earth is the bare CPC, green/yellow sleeved, bonded to the back box and the switch earth terminal. If absent, metal accessories require urgent professional assessment before proceeding. Label conductors before disconnecting.
Wire a 1-Gang 1-Way Light Switch (COM & L1)
| Item | Action |
| Permanent live (brown/red) | Into COM |
| Switched live to the lamp | Into L1 |
| Earth (green/yellow) | To the earth terminal/back box |
| Neutrals (blue/black) | Stay in the connector, not on the switch |
| Cable management | Sleeve, dress, and secure conductors |
Earth continuity must be maintained even if the faceplate is plastic; bond the metal back box if present. Neutrals are not switched on a 1-way plate, so they remain joined in an insulated connector within the box. Finally, refit the plate without trapping cores, restore power, and confirm the switch gives simple, reliable control.
Wire a 2-Way Light Switch (COM, L1, L2)
A 2-way light switch is used when one light needs to be controlled from two locations, such as the top and bottom of a staircase. Each switch has three terminals: COM, L1, and L2. Power enters the first switch at COM (either the permanent live feed or the switched live, depending on circuit design), then travels between switches on the two “strappers” connected to L1 and L2.
To wire it, identify the common conductor for each switch and terminate it in COM. Connect the two strapper conductors between the switches: one goes from L1 to L1, the other from L2 to L2 (or swap at one end to change which toggle position is “on”). The remaining COM typically goes onward as the switch is live to the lamp. Neutrals stay joined in the back box, not on the switch. Earths must be sleeved and bonded to the metal back box and switch faceplate.
Wire a 2-Gang Light Switch (Keep Circuits Separated)
Where two lighting circuits need to be controlled from the same location, a 2-gang switch provides two independent switches in one faceplate, and each gang must be wired as a separate circuit. The aim is choice without cross-feeding: each gang takes its own permanent live (or switched live arrangement) and returns only to its own lamp circuit, with neutrals staying in the back box or ceiling rose, not on the switch.
- Identify which cable belongs to circuit A and circuit B, keeping lives, switched lives, and CPCs grouped and sleeved correctly.
- Terminate circuit A’s live feed into COM of gang 1 and its switched live into L1 (or L2 as required), then repeat for circuit B on gang 2.
- Maintain earth continuity by bonding all CPCs together and to the faceplate earth terminal; do not link COMs unless both gangs are genuinely one circuit.
Separation preserves independence and prevents unintended control paths.
Refit the Switch, Restore Power, and Fix Common Faults
With both gangs terminated and kept electrically isolated, the next step is to refit the switch safely, restore power in a controlled manner, and verify operation. Conductors should be folded neatly, keeping CPC earths continuous and sleeved, then the faceplate offered up without trapping insulation. Screws are tightened evenly so the plate sits flush and the mechanism stays true.
At the consumer unit, the breaker is re-energised, and the switch is tested one gang at a time, confirming each light responds correctly. If nothing works, the likely causes are a missing permanent live feed, a loose COM connection, or a tripped RCBO. If a light stays on, the switched live may be in COM and the feed in L1. If the operation is reversed, L1 and L2 are swapped. If RCDs trip, suspect neutral-earth contact, damaged insulation, or shared neutrals between circuits; isolate and correct before retrying.
Frequently Asked Questions
Do I Need Building Regulations Approval to Change a Light Switch in the UK?
Usually not; replacing a like-for-like light switch is generally non-notifiable in the UK. Approval may be needed in special locations, new circuits, or consumer unit work. They should comply with Part P requirements.
What Switch Rating Do I Need for LED, Fluorescent, or Dimmable Lighting?
Most LED/fluorescent loads suit a 6A or 10A switch, but inrush may require 10A or higher. Dimmable circuits need a compatible dimmer rated for LED/CFL and total wattage. Verify manufacturer limits.
Can I Replace a Standard Switch With a Smart Switch Without a Neutral Wire?
Sometimes, but only with a non-neutral smart switch designed for two-wire installs; otherwise, a neutral is required. They should confirm UK wiring at the back box, load type, and guarantee a safe, compliant installation.
How Do I Choose Between Plastic and Metal Switch Plates for Safety?
For safety, plastic plates are insulating and reduce shock risk, while metal plates must be properly earthed and installed. In damp or busy areas, plastic is often safer; metal suits robust aesthetics when grounding is certain.
When Should I Call a Qualified Electrician Instead of Doing the Wiring Myself?
A qualified electrician should be called when work involves consumer units, unfamiliar circuits, damp zones, repeated tripping, overheating, aluminium wiring, or uncertainty. If regulations, testing, or isolation can’t be met with confidence, freedom comes from safe delegation.
Conclusion
Wiring a light switch in a UK home is straightforward when the correct circuit type is identified, and safe isolation is followed. With the right tools, conductors can be confirmed, earths secured, and terminals connected correctly for 1-way, 2-way, or 2-gang switches for How to Wire a Light Switch UK. Careful circuit separation and tidy terminations reduce the risk of faults. After refitting, power can be restored and tested methodically to safely resolve common issues.